 For months, I've been pinning teachers gift ideas to my "teachers stuff" Pinterest board, gathering inspiration for when the time came to make something for my children's teachers. I always like to give a handmade gift to their teacher...but narrowing it down was a difficult task! There's so many incredibly talented people, creating gorgeous pots, and crayon art, and much, much more. I finally decided to customise some canvas totes like this (see left). The original inspiration came from this blog.
I love environmentally friendly bags, and this one is so much prettier than the standard green ones from the supermarket. To start, I purchased two canvas bags from Spotlight ($2 each), and some fabric remnants that coordinated with the apple green I wanted to use.
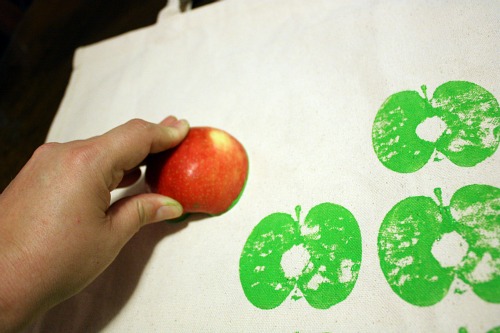
Here's how I created my version. First I dug through the fridge to find a good looking shaped apple. I cut the apple in half so that the stork was still on one side. I normally use disposable plastic plates when I'm painting, but for the life of me, I couldn't remember where they were...so I used the lid from a container instead (the base of which is currently MIA). I brushed some paint onto the apple, and did some test stamping on some paper towel, to figure out how much paint I actually needed. Then I started stamping onto the bag, reapplying paint each time.
I continued stamping across the bag with the one colour, leaving space for the contrasting colour. You could use two stamps and alternate your colours, but my apple only had the stork on one side and I didn't want to waste another piece of fruit. Here's a tip...put some cardboard inside your bag so that you have a flat surface to work on, and it stops the painting seeping through to the other side.
Next up, I cleaned the green paint off the apple, then started brushing blue glimmermist onto the surface (I couldn't find my blue paint...of course!). The glimmermist worked really well on the canvas.
Once the paint was dry, I cut remnants of fabric to fit the sides of the bag. As this was a shop bag, I had to cover up the logo somehow. I would recommend using a thicker fabric, or one with a dark base so that the logo doesn't show through. I turned the edges and pinned it to the bag, then gently worked my way around....only breaking one needle. Considering my machine is now 16 years old, and I've never changed the needle, it was probably due...oops. My method was very organic...no measuring...I just cut a rectangle and turned the edges. If you're more anal about it, you would measure, cut, iron etc. I just don't have time for that. lol. Excuse the crappy photo...it was 11.30pm last night!
Here's the finished bag! I love how it turned out, and I'm so glad I purchased a bag with a flat base...not only will it hold more, but I was able to jazz it up with the pretty floral fabric on the side. I might have to make one for myself now!
My friend Keti very kindly agreed to pose for photo of the bag in action. You can see the straps fit really well over the shoulders, and it'll be able to hold heaps! Just perfect for a school teacher who needs to carry papers and reference materials to and from home.
I can't wait to wrap them up and deliver them to the school. I really appreciate everything my children's teachers have done for them this year, and I hope this little token of appreciation shows that.
Have you made something crafty for your child's teacher this year? Go on and share your links.
Linking up with Kirsty for...


